Getting started in woodworking can be a challenge especially if you don’t know where to begin.
There are many different types of materials, tools, and machinery available specifically for woodworking and each one comes with its functions. However, before you go shopping for materials and tools, it is extremely important to understand a few basic terms related to woodworking.
This comprehensive guide covers the terminology, tools, equipment, and processes related to woodworking. The aim is to help you understand more about the subject, identify certain items, and how to understand the uses of certain pieces of equipment.
What is Woodworking?
Woodworking typically involves cutting and assembling pieces of wood to create desired shapes or structures like furniture, musical instruments, boats, etc.
It is a very hands-on skill with virtually unlimited potential for customizing designs to suit your needs. Woodworkers add their touch to a wooden piece or even build one from scratch. There are almost limitless possibilities for customizing existing designs and creating all sorts of other products.
There are many different types of projects created using this skill, but one of the most common is furniture. Furniture is basically what most people think of when they think about woodworking.
The beauty of using wood as a crafting material comes with its versatility, making it possible to work in any direction you please provided you have a plan and know how to cut out your shapes using the correct tools.
Basic Woodworking Terminologies You Need To Know
A lot of terms are necessary to learn when you start woodworking to understand the language of the people who make items using wood. These may seem difficult at first, but they will soon become second nature to you.
Here is a list of the most common terminology used in woodworking:
- Abrasive: An abrasive is a substance that removes wood fibers by rubbing on them commonly with the help of a harder material such as sandpaper.
- Acetone: Acetone is a chemical compound used for removing paints and finishes.
- Bar Clamp: Bar clamps can be set to grip different sizes of workpieces and will hold tight while you are working on them. They are specifically useful for keeping the edges in place when gluing.
- Band Saw: This is a power saw used to cut wood or metal materials into specific shapes and sizes.
- Brad Nailer: A nail gun that allows you to easily drive nails into the wood without having to use a hammer.
- Cantilever: A projecting beam or structure used in bridge construction that is supported at only one end.
- Chamfer: A bevel cut at the end or along an edge of a board.
- Chamfer Knife: A chamfer knife is a large shaver used for trimming and smoothing out sharp edges to keep people from hurting themselves.
- Clamp: Clamp is a device used to hold or secure objects tightly together to prevent movement or separation. The most common form of clamp used in woodworking is the C-clamp.
- Domino: The domino is a fastener used in woodworking to join two pieces of wood so that they fit snugly together.
- Dowel: A small cylindrical rod used as reinforcement for holding components together in woodworking and carpentry.
- Draw Knife: A draw knife is a cutting tool that has a long, thin blade and handles on both ends. This tool can be used for shaping wood by removing shavings from its surface.
- Enamel: Enamel is a high-varnish coating that is applied to wood to provide it with a glossy finish.
- Epoxy: Epoxy is a type of adhesive that needs two parts- a compound and a catalyst. When properly maintained, it can last for more than 20 years.
- Framing Square: A tool used by carpenters for marking right angles and installing framing materials on walls or other structures.
- Glue: A natural or synthetic material that holds two pieces together while they dry out.
- Grain Pattern: The grain pattern is what the design of the wood grain looks like on a log. It is most visible in hardwoods like oak, mahogany, and walnut. In softwoods, it is less noticeable or even absent altogether.
- Hacksaw: A hacksaw is a saw that can cut different materials. It has a blade with 14 to 32 teeth per inch. The two most common types of hacksaw blades are carbon steel blades for wood and high-speed steel blades for materials like steel.
- Heartwood: It is the name given to the central part of a tree trunk that is usually darker in color and denser than the outer sapwood.
- Lumber: Lumber refers to all types of timber, including softwood like pinewood, hardwood like oak, and engineered wood such as plywood.
- Plywood: Plywood is a type of engineered wood that has thin sheets or layers of veneer compressed and oriented at right angles to each other.
- Sapwood: Sapwood is found on the inside of a tree’s bark and it can be seen as a lighter color on the outside of the trunk.
Woodworking Materials You Will Need To Get Started
When you plan to construct an item, the first thing that comes to your mind is probably the materials to use for the project.
Some people prefer one material type over another since it can be cheaper and easier to use. Others might have specific needs for their furniture or other home appliances that require using the best materials even though they might be more expensive.
The materials woodworkers use vary and are often dependent on the project being undertaken.
1. Wood

Wood is the most common material used by woodworkers. It can be easily shaped into any desired form. It is also relatively inexpensive, making it an attractive option for a wide range of products.
A great number of items are made from wood including tables, chairs, doors, shelves, built-in cupboards, bed frames, and so much more.
Woodworkers often have different types of wood, such as pine, ply, oak, mahogany, cherry, and maple, to choose from depending on their needs.
Each wood type has its ranking and properties that make it superior to other types.
2. Nails & Screws

Nails, screws, and other fasteners are common woodworking materials used to assemble wooden objects. The different types of fasteners will depend on the type of wood you are working with and how sturdy you want the object to be.
A nail is a thin, pointed object made from metal that is hammered into the surface of a material to join it together.
A screw has a head on one end and threads on the shaft that can be turned using a screwdriver to fasten materials together. You can’t hammer a screw. It has to be screwed in.
If you need strong joints, screws are usually the best option. They usually require drilling a hole to insert them.
3. Wood Adhesive or Glue

Glues are adhesive substances that bind materials together by chemical reaction. They are used to hold pieces of wood together.
Adhesives can be used in different applications like gluing wood together and filling in gaps and cracks. It can also be applied to ceramic, metal, glass, and other materials.
They are made using various types of materials such as animal bones and tissues, plant material, or bones and skin of fish.
There are many types of wood adhesives available in the market. One of the most popular types of wood adhesive is polyvinyl acetate (PVA) glue which has been around since 1912.
4. Abrasives

Abrasive materials are used in woodworking to create a desired surface on the wood. They work by getting rid of unwanted roughness on wood through extensive rubbing. They can also be used to remove stains or varnish from surfaces.
The most common abrasive material in the woodworking industry is aluminum oxide sandpaper due to its affordability, reliability, and versatility.
Other abrasives include silicon carbide, ceramic, and garnet.
5. Finishing Materials

Whether you are a seasoned woodworker or just getting started, using the proper finishing materials is vital to a successful finish on any project.
There are several different categories of finishing materials used for woodworking and each serves a different purpose to accomplish your desired look.
These materials have to be applied at the end of the project to make it look good and protect it from damage over time. They include wash coats, basecoats, varnishes, stains, enamels, and sealants.
The most common type of finishing material is varnish. Varnish is a type of transparent protective film that contains resin. It has two purposes. The first is to give your work a soft luster. Secondly, it protects your item from wear and tear.
Commonly Used Woodworking Tools & Machinery
When you’re a woodworker, there’s no shortage of tools and machinery at your disposal. Here are some of the most commonly used woodworking tools and machinery in a workshop:
1. Hammer:

A standard claw hammer is the most basic tool in any woodworker’s arsenal. It is used to drive nails into wood and also to pull out nails from wood. You can find a selection of claw hammers at any hardware store.
2. Clamps:

Clamps are used for holding wooden pieces together while you work on them. C clamps also known as G clamps are commonly used by woodworkers and they come in a variety of sizes; from small to large.
3. Sandpaper:
Sandpaper is a cutting tool. The primary purpose of sandpaper is to smooth rough surfaces and remove imperfections from wood surfaces so that they’re ready for finishing products like varnish or stain.
Sandpaper comes in different grits, each designed for specific tasks like smoothing splintery wood or removing paint stains from surfaces.
4. Chisel:

A chisel is a tool most often used by carpenters and woodworkers for some woodworking jobs such as making hinges for doors.
5. Saw:

A saw is a cutting tool that is used in the process of making boards from logs or other pieces of lumber. It consists of a handle, a blade with sharp teeth mounted on the end of a long blade.
6. Wood Moisture Meter:

It helps to measure the moisture content of the wood. A moisture meter will determine the suitability of the wood for your intended application and help with getting the best results from your project.
7. Drill Press:

A drill press is an electric machine that helps create holes in hard materials such as wood. It is rotated downward, causing the tool to sink into the material.
8. Power Miter Saw:

Power miter saws are used to make angled cuts easily. A miter saw is a versatile tool that is essential to every woodworker or carpenter. From construction to DIY, they can be useful in several situations.
9. Router Table:

A router table is used by many professionals in furniture production because it allows them to easily make accurate cuts, trim woodwork, and edges, or join pieces together.
10. Tack Hammer:

The tack hammer is also called an upholstery hammer. It is useful for driving small nails or tacks into the wood. Tack hammers have a very small head that is designed to deliver light blows to avoid damaging the surface of what you are working on.
11. Hand Planer:

A hand planer is a type of hand-held tool that is used to smooth surfaces quickly and easily. The point of a planer is to straightening-out boards and flatten them down without having to break a sweat.
12. Circular Saw:

This power saw’s blade rotates at high speed and cuts through wood quickly. It is useful in cutting large boards at different angles.
13. Tape Measure:

A tape measure is a measuring device that uses a long strip with a series of measurement markings on it. The device is usually in the form of a coil and is used to measure wood.
14. Screwdriver:

A screwdriver is a hand tool or power tool used for driving screws into the wood as well as tightening or loosening screws.
Many types of screwdrivers for woodworking are designed for different purposes. The wrong screwdriver can damage your screw and also whatever material you’re trying to screw on.
15. Compass:

A compass is a drawing instrument that has two points, one of which is fixed and the other pivots. It can be used for drawing circles or arcs in woodworking, metalwork, or any other form of engineering drawing.
16. Marking Gauge:
It is used to transfer dimensions to a workpiece, and mark out lines for cutting or shaping. The gauge consists of a long knife held in place by a wedge used to mark wood.

17. Jointer:

A jointer is one of the machines that can be used for creating a flat surface down the length of a wooden board. It saves you time in preparing your board edges for jobs by straightening them out with a high level of precision.
Keep in mind that these are not the only tools and machinery you will need, but they are a good start.
Types of Joints Used In Woodworking
In woodworking, joints are the connection points between two pieces of wood. They are designed to help wood pieces stay together, so you don’t have to use adhesives. Joints come in a variety of shapes to suit different needs and purposes.
Whether you are a carpenter or a woodworker, knowing all about the different types of joints can be very beneficial for your work.
1. Butt Joint

This is the simplest type of joint, where the two pieces of wood meet at a right angle (90 degrees). Butt joints are not as strong as other joints but are quick to make. There are more than just plain old butt joints out there. Other types of joints include:
2. Miter Joint

This is a more complicated joint that requires cutting the ends of two pieces at a 45-degree angle, so they will fit together and form a 90-degree angle. This type of joint is often used in painting and picture frames and large furniture such as cabinet face frames.
A miter joint won’t leave you with the strongest possible connection. However, if you’re going for a more decorative look then it’s worth looking into.
3. Mortise & Tenon Joint

Mortise and tenon joints are among the oldest joints in woodworking. The joint is formed by the interlocking of two pieces of wood, typically along an edge.
The mortise hole is a slot cut into a piece of timber to receive the tenon. The tenon tongue is a projection on the end of another piece of timber that fits snugly into a mortise.
It is a simple-looking joint but it is one of the strongest joints.
4. Finger Joint (Comb Joint)
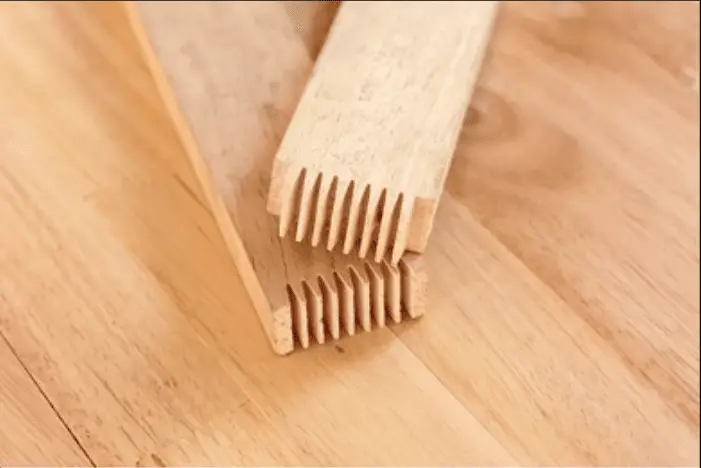
A finger joint is a type of joint in which two boards are cut with complementary interlocking profiles, creating a sturdy connection. The joint is extremely strong and can be reinforced with quality adhesive.
5. Dowel Joint
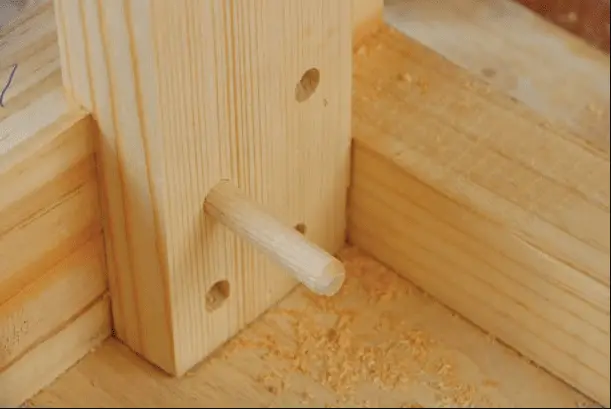
A dowel joint is a joint that connects two pieces of wood using a cylindrical rod. The dowels act as pegs that go through both pieces of wood to secure them together. Dowel joints and butt joints are often used together in furniture-making.
These types of joints are easy to make and can be very strong if done correctly.
6. Scarf Joint

A scarf joint is a method of joining two pieces of wood end to end. It is used when one needs a strong connection between two pieces of wood that are of different lengths.
One of the vital things about scarf joints is that they are strong, simple, and also look elegant. You only need a few tools to make them and there’s no complicated skill involved either.
7. Dovetail Joint

The dovetail joint is one of the strongest joints in woodworking. Its strength comes from the interlocking of the end of one board with the end of another board. Furthermore, the large glue surface greatly increases its strength.
Dovetail joints tend to be less strong when they are poorly made.
8. Biscuit Joint

A biscuit joint is made by cutting slots in two pieces of wood, then inserting compressed wood chips into the slots and gluing them into place.
Biscuit joints are great for when you want to use a joint that doesn’t take too long to make and that is also very consistent. They provide less strength than other joints, however, they are stronger than a dowel joint.
Woodworking Fasteners
Fasteners are the basic building blocks of a woodworking project. They are used to assemble raw materials into useful objects and are used in every type of woodworking project you can imagine, from wooden cabinets to roofing or the construction of bridges.
The selection and proper use of fasteners is a vital part of the skilled craftsman’s arsenal. Here are some of the most essential ones:
1. Nails:
These are thin steel or aluminum pins with heads at one end, which can be hammered into the wood to hold pieces together tightly and securely without glue or other adhesive material. Common nails, brand nails, drywall nails, framing nails, finishing nails, and box nails are good examples of nails.
2. Screws:
A screw is a fastener with threads. At the top, it usually has a head that allows for easy turning. Many commercial businesses rely on screws to hold things together and make the job easier. There are different types of screws for woodwork and each is best suited for specific situations.
3. Dowels:
These are small cylindrical rods that can be inserted into holes drilled in the ends of two boards and then glued together as a way of joining them securely. Dowels are thick and sturdy, which means they are a good alternative to screws and nails.
4. Nuts:
A nut is a threaded mechanical fastener used with a mating bolt to fasten two or more components together. The two most common nuts for wood are the tee nuts and the insert nuts. They come in a variety of sizes so they can be used in many different applications.
5. Staples:
A staple to fasten two pieces of wood is usually made by bending a wire into the letter “U”. This type of fastener is mostly used temporarily.
Basic Woodworking Process & Procedures
Woodworking isn’t hard if you know the basic woodworking procedures. Basic woodworking processes need to be followed when creating a well-made product. That is why you need to understand the basic procedures involved.
The process of turning wood into a usable product is usually broken down into these basic stages.
1. Planning
The first step in the woodworking process is planning, which involves determining what the project will be, how it will be built, and where it will be built. The plan should include information about size, quantity, weight, and structural integrity.
After you’ve planned your project, you need to prepare the woodworking materials for use in the actual construction of your product.
2. Drying
Drying is the process of removing excess moisture from the wood. Wood needs to be dried to a moisture content of between 9% to 14% before it can be used.
The drying process is an important step because it helps in preventing the warping, cracking, and shrinking of the finished product. It also helps with preventing fungus and insect infestations, which can lead to structural damages like decay and rot.
There are different ways to dry the timber. The more traditional method involves drying out the lumber stacks using air. You can alternatively use a kiln to dry your unfinished wood because it cuts down drying time without the wood having drying defects. Wood dried in this way is known as kiln-dried lumber.
3. Sawing
This involves using tools such as saws to cut down lumber pieces so that they can be used as part of the final project. The sawing process may be done manually with a hand saw or with a power tool.
Hand saws include a basic hand saw, pull saw, hack saw, rip saw, fret saw, Japanese saw, veneer saw, etc. You can also use electric saws like a chainsaw, jig saw, miter saw, circular saw or table saw for cutting wood.
4. Assembly
When you are finished with the sawing or machining, it is time to assemble the piece you have cut out. Assembly involves putting together different parts of a project to create a completed project such as a dining table or cabinetry. The parts may be fit together using glue, screws and bolts, nails, or other fasteners such as dowels or pins.
This step ensures that everything fits together properly and stays in place while the wooden product is being used.
5. Sanding
The process of abrading the surface of a piece of wood so that the wood fibers are uniformly rough is known as sanding. This creates a uniform layer on your wood that looks and feels smoother than before.
Sanding is the first step in finishing your workpiece. It has varying grits that allow you to smooth out imperfections in your piece before applying a coat of stain or paint.
6. Finishing
Finishing is a process used to protect the wood from damage caused by moisture, exposure to the elements, and other factors. It involves the application of a topcoat to the surface of a woodwork piece.
The finishing process entails several steps that help to make your finished product look its best. It includes staining, sealing, or painting the wood surface with a desired finish or varnish.
Conclusion
After reading through this guide, you should have a pretty good understanding of some woodworking terms and the tools and equipment needed for projects. Hopefully, you feel a little more comfortable with the jargon surrounding woodworking and appreciate how all the processes fit together.
If you’re new to woodworking it will take some time to learn the terminology and the proper use of tools, but the basics are very simple. Take the time to familiarize yourself with the basic procedures, then dig in and start making items from wood. Remember that practice makes perfect, so don’t be afraid to get your hands dirty and try some hands-on work.
Most importantly, don’t be discouraged by the seemingly-overwhelming amount of terminology and techniques.