Varnish is an excellent way to protect wood surfaces from damage such as wear and tear, moisture, and scratches.
However, over time, the varnish itself can become damaged, discolored, or worn out, affecting the wood’s appearance and durability.
In such cases, it becomes necessary to remove varnish from wood to restore the natural beauty of the wood and protect it from further damage.
There can be several other reasons also for you to think of stripping off the varnish from the wood piece.
You may want to refinish a piece of wood furniture or flooring to update its appearance or match it with a new decor scheme. This occasion also counts for the process of removing varnish from the wood.
Can We Paint Over Varnish?
If you want to paint over a varnished surface, the paint will not adhere properly to a varnished surface, leading to an uneven finish and potential peeling or chipping.
Removing the existing varnish is necessary to prepare the wood surface for the new finish. And also, if the varnish itself is damaged, such as by cracking or peeling, it must be removed before applying a new coat.
Failure to remove the damaged varnish will result in an uneven or bumpy finish that will not provide adequate protection to the wood surface.
4 Simple Ways To Remove Varnish From Wood
Now, let’s look into some natural ways to remove varnish from wood. We’ll also discuss the tools you may require for the process and the pros & cons of choosing the said method.
Method 1: Sanding
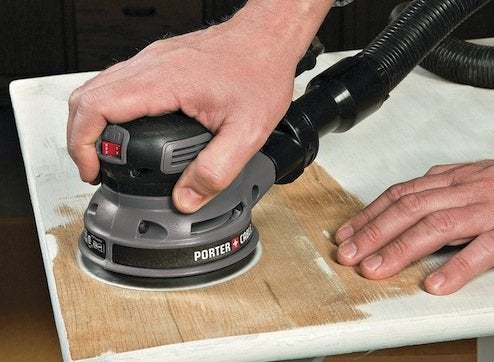
Sanding is a popular method for removing varnish from wood surfaces. It involves using abrasive materials to scrape off the old varnish, leaving the wood looking fresh and clean.
Sanding is a good option when the varnish is thick and difficult to remove with chemicals or other methods.
To start with, you would need sandpaper, a sanding block, and a dust mask. You may also need a vacuum cleaner to clean up the dust.
Steps:
The procedure for removing varnish using sandpaper is very simple.
- First, choose the appropriate sandpaper grit depending on the type of wood and the thickness of the varnish.
- Start with a coarse grit to remove the majority of the varnish, and then move to finer grits for a smoother finish(Start with 150-grit sandpaper and sand the entire surface.
- Once you’ve done that, move onto 220-grit sandpaper and repeat) Sand in the direction of the wood grain and be sure to wear a dust mask to protect your lungs.
Benefits of Sanding Varnish:
Benefits of sanding varnish include the ability to remove the varnish entirely, leaving the wood looking brand new.
Sanding also allows you to create a smooth surface that is ready for refinishing or painting.
Drawbacks of Sanding Varnish:
However, sanding can be time-consuming and requires some skill to achieve a smooth finish. It can also create a lot of dust, which can be messy and require extra cleanup.
Method 2: Varnish Stripper
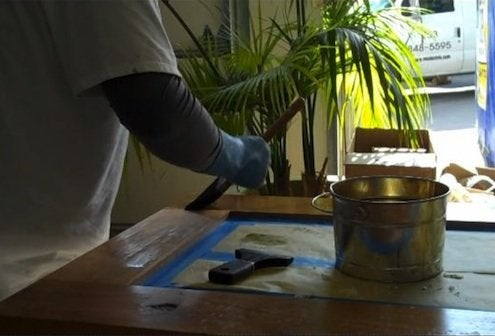
Varnish Remover is a chemical solution used to remove varnish from wood. Old furniture or wooden surfaces that have become stained, scratched, or damaged may be effectively restored with this technique.
Yet using a varnish stripper needs to be done carefully because the chemicals can be corrosive and even harmful if not handled properly.
The tools you’ll need to make this happen are:
- Varnish stripper solution
- Paintbrush
- Scraper or putty knife
- Steel wool
- Safety glasses & masks
- Drop cloth or newspaper
Steps:
- Prepare your workspace by laying down a drop cloth or newspaper to protect your work surface.
- Put on protective gloves, safety glasses, and a respirator or mask to protect yourself from the varnish stripper.
- Apply the varnish stripper to the wood using a paintbrush or roller, making sure to cover the entire surface evenly. Follow the instructions on the product label for how much to apply and how long to leave it on.
- Allow the varnish stripper to work its magic for the recommended amount of time. This typically ranges from 15 to 45 minutes.
- Use a scraper or putty knife to scrape away the softened varnish gently. Be careful not to gouge or damage the wood surface underneath.
- Once you remove as much varnish as possible with the scraper or putty knife, use steel wool or sandpaper to gently sand away any remaining varnish or residue. Work in the direction of the wood grain to avoid damaging the wood fibers.
- Once you’ve removed all the varnish, wipe the wood down with a clean, damp cloth to remove any dust or debris.
- Allow the wood to dry completely before applying any new finishes or stains.
Benefits of Using Varnish Stripper:
When it comes to stripping varnish from wood, varnish strippers have several benefits.
Their efficiency is one of the main benefits. Varnish strippers are created to weaken the chemical link that holds varnish to wood, making removal easier.
They can dig deep into the wood grain, guaranteeing that all varnish layers are eliminated. This is crucial if the varnish is especially old and challenging to remove, or if the wood has multiple coats of varnish.
As a comparison to sanding, using a varnish stripper can also save a massive amount of time and work, particularly if the wood surface is huge or detailed.
Drawbacks of Using Varnish Stripper:
Varnish strippers are effective, but they also come with some drawbacks that need to be considered before usage.
The potential harm they may do to the environment and to human health is one of their biggest drawbacks.
Varnish strippers are frequently made of potent chemicals that can generate toxic fumes and, if improperly disposed of, damage land and water. Particularly if the wood is already weak or damaged, several varnish strippers can soften it and make it more prone to damage.
Moreover, varnish strippers can be pricey and may need to be applied more than once to completely remove the varnish. The usage of varnish strippers should be carefully studied before use even if they are an efficient approach to removing varnish.
Method 3: Heat Gun

Using a heat gun relatively quick and efficient method that requires minimal effort. You would need tools like a heat gun, paint scraper, sandpaper, safety goggles, protective gloves, and a dust mask.
Steps:
- Put on your protective gear – safety goggles, gloves, and a dust mask or respirator.
- Plug in the heat gun and set it to a low to medium heat setting.
- Hold the heat gun 2-3 inches away from the varnish and move it back and forth across the surface.
- Use a paint scraper or putty knife to gently scrape off the softened varnish. Be careful not to gouge the wood.
- Repeat steps 3 and 4 until all of the varnishes have been removed.
- Sand the surface with sandpaper to remove any remaining varnish and smooth the surface.
Benefits of Using a Heat Gun To Remove Varnish:
The advantages of using a heat gun for this task include its speed and efficiency, requiring minimal effort, and low cost.
It can remove varnish from intricate details and hard-to-reach areas without damaging the wood.
Drawbacks of Using a Heat Gun To Remove Varnish:
However, there are also some disadvantages to using a heat gun for removing varnish from wood.
The risk of fire is significant if the heat gun is not used properly, as high temperatures can ignite nearby materials.
Additionally, inhaling the fumes produced by the heat gun can be hazardous to your health, and holding the heat gun too close to the wood or leaving it in one spot for too long can scorch or burn the wood, causing damage.
Method 4: Soda Blasting
Soda blasting involves using a specially designed soda blasting machine that blasts sodium bicarbonate (baking soda) particles at a surface under high pressure.
To perform soda blasting, you will need a soda blasting machine, which is a specialized tool that blasts sodium bicarbonate particles at high pressure.
The machine can be purchased or rented, depending on the frequency of use. Other tools needed include a compressor, which supplies air to the machine, a protective suit, gloves, and safety goggles to protect the operator from the blasting particles and other contaminants.
Steps:
- Prepare the surface – the surface that is to be blasted should be prepared by cleaning it thoroughly and removing any loose debris or contaminants.
- Set up the machine – connect the compressor to the soda blasting machine and fill the hopper with sodium bicarbonate particles.
- Adjust the pressure – adjust the pressure of the machine to suit the surface being blasted. The pressure should be high enough to remove the contaminants but not so high as to damage the surface.
- Blast the surface – aim the nozzle of the machine at the surface to be blasted and move it back and forth in a sweeping motion until the contaminants are removed.
- Clean up – after the blasting is complete, clean up the area by removing any leftover soda particles and other debris.
Benefits of Using a Soda Blasting To Remove Varnish:
One of the main advantages of using soda blasting is that it is a gentle method that does not damage the surface being blasted.
Unlike sandblasting, which can be abrasive and damage delicate surfaces, soda blasting is gentle enough to use on materials like glass, plastic, and chrome.
Another advantage is that it is an environmentally friendly method of surface preparation. The sodium bicarbonate particles used in soda blasting are non-toxic and biodegradable, making it a safe alternative to other blasting methods.
Drawbacks of Using a Soda Blasting To Remove Varnish:
One disadvantage of using soda blasting is that it can be a slow process, especially when compared to other blasting methods.
This is because the sodium bicarbonate particles used in soda blasting are not as abrasive as other blasting media, such as sand or glass. It has one more drawback.
The whole process can be messy, and the soda particles can be challenging to clean up. This is because the particles are so fine that they can easily become airborne and settle on other surfaces, requiring additional cleanup.
Final Verdict
There are several methods for removing varnish from wood, including sanding, varnish stripper, heat gun, and soda blasting.
Each method has its advantages and disadvantages, and the choice of which method to use depends on several factors such as the type of wood, the surface condition, the amount of time and effort required, and the user’s experience and preferences.